Once the inVibe Research plugin is connected, ask about a study in plain language. Your AI app picks the right skill for the question, whether that’s a content or linguistic analysis, coding responses by topic, or finding the quote that best supports a point. These are the same skills behind inVibe Agent, and our linguists test each one against studies they’ve already analyzed.
- Get the plugin Your IT team makes it available
- Connect Start in your AI app
- Approve On the inVibe page
- Check Send one test prompt
Before you begin
- Finish your inVibe registration. If you received an invitation email, complete the registration first. If you already have an inVibe account, use your existing login.
- Find the inVibe Research plugin in your AI app. Your IT team or app administrator makes the plugin available. If you can’t find the plugin, contact them.
- Use your own inVibe login. You don’t need a separate password or key for the plugin.
Connect in your AI app
Choose your app, then follow its steps.
Claude
Claude walks you through adding and connecting the inVibe connector.
Select Plugins in the sidebar, and then open inVibe Research. If the invibe connector already shows Connected, skip to Check your connection. Otherwise, select Finish setup.
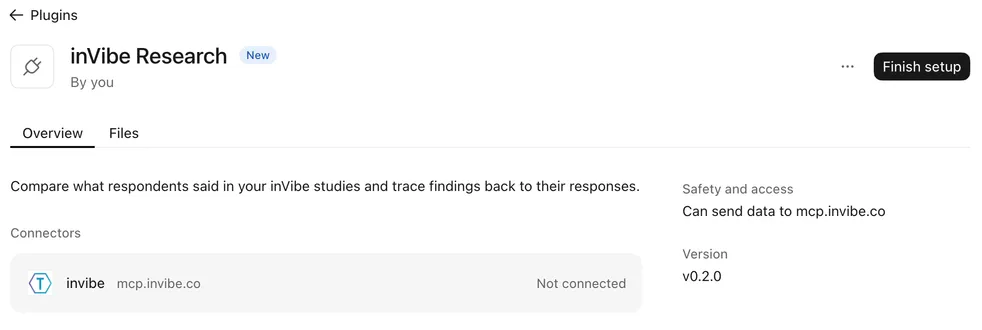
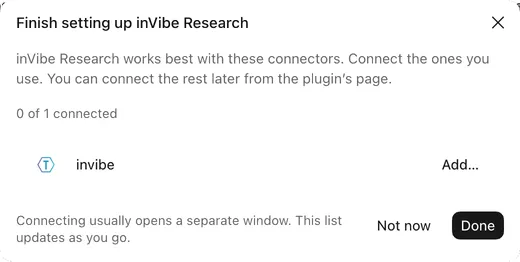
Next to invibe, select Add…. If you see Connect instead, your Claude Owner already added the connector. Skip to step 5.
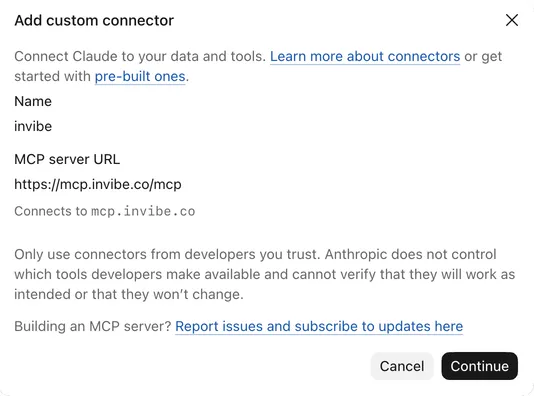
Claude fills in the connector name and server URL. Select Continue.
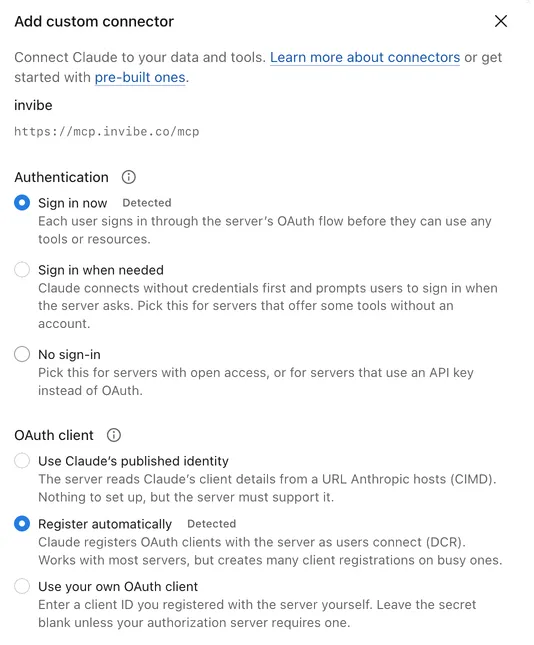
Keep the detected settings: Sign in now and Register automatically. Don’t add request headers. Then confirm at the bottom of the dialog.
Back in Finish setting up inVibe Research, select Connect.
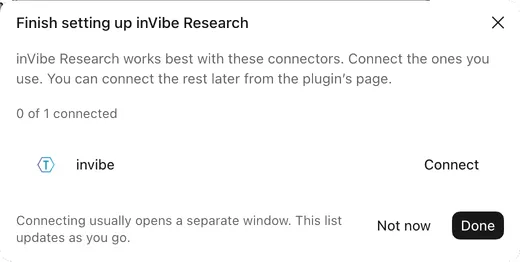
Your browser opens. If Claude asks Finish connecting a connector?, select Continue connecting. Then go to Approve in inVibe.
Claude can’t connect you from inside a chat. Use the plugin page.
ChatGPT
Use the ChatGPT desktop app. For now, inVibe Research works only in Work, not in Chat.
Select Plugins in the sidebar, and then open inVibe Research. Look under your workspace’s tab or Personal. Select Install plugin.

Your browser opens. Go to Approve in inVibe.
Back in ChatGPT, inVibe Research is ready for use appears. Select Set up inVibe Research.
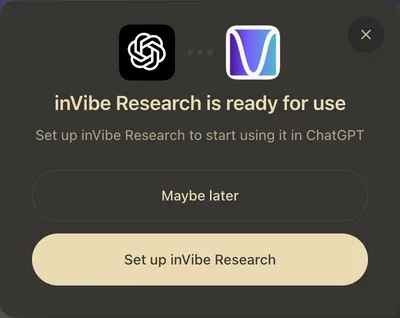
ChatGPT starts a new Work chat and sets up inVibe Research. Then check your connection.
ChatGPT doesn’t have a separate sign-in button for inVibe. If a chat says inVibe isn’t connected, see Fix connection problems.
Another app
Apps that run on your computer can connect if they support remote MCP servers with sign-in.
In your app, add a remote MCP server with this URL:
https://mcp.invibe.co/mcp- Start the app’s sign-in for that server.
Your browser opens. Go to Approve in inVibe.
A web-based app needs inVibe to allow it first. Contact your inVibe team. A direct connection gives your app inVibe data, but not inVibe’s setup and research guidance. The inVibe Research plugin includes both.
Approve the connection in inVibe
This step is the same for every app. Your app opens an inVibe page in your browser.
- If inVibe asks you to sign in, sign in with your inVibe login.
- Check that Signed in as shows your account.
- Review the access, and then select Authorize read-only access.
- If your browser asks to open your app, allow it.
- Return to your app. In Claude, the setup dialog shows 1 of 1 connected. Select Done. In ChatGPT, a dialog says inVibe Research is ready for use.
In ChatGPT, the inVibe page asks to connect Codex. That’s expected. ChatGPT Desktop connects under that name.
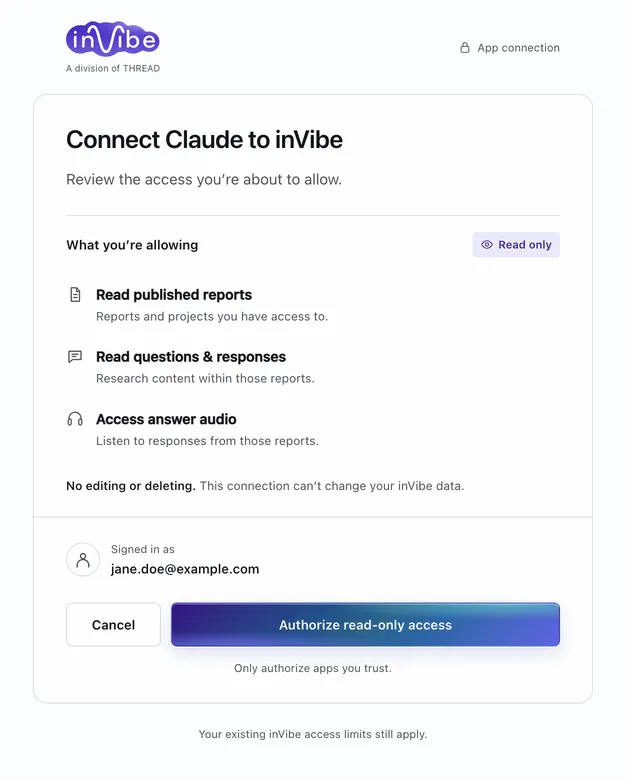
The connection is read only. It lets your AI app:
- Read published reports and projects you have access to.
- Read the questions and responses in those reports.
- Play answer audio from those reports.
The connection can’t edit or delete your inVibe data. Your existing inVibe access still applies, so you see only the projects your account can open.
Check your connection
In a new conversation, send this prompt. In ChatGPT, use a Work chat and type @inVibe Research first.
Use inVibe setup to check my connection with one discovery-only project search. Return at most one real study’s name and basic details. Do not retrieve study evidence or start analysis.
If the connection works, the assistant shows one study you can access. If your account can’t see any studies yet, the assistant says so. In that case, contact your inVibe team to confirm your project access.
Fix connection problems
Find what you see, then follow the fix next to it.
- You can't find the inVibe Research plugin.
- Get help Contact your IT team or app administrator.
- The assistant says inVibe isn't connected.
- Try this Connect the plugin again, then start a new conversation.
- inVibe Research doesn't work in a ChatGPT chat.
- Try this Check that you're in Work, not Chat. For now, inVibe Research works only in Work. Switch to Work and start a new chat.
- ChatGPT says inVibe tools aren't available, and there's no sign-in button.
- Try this Quit ChatGPT and reopen it. Then start a new Work chat. If it still happens, contact your inVibe team.
- Try this The link may have expired or already been used. Go back to your AI app and connect again.
- Try this Allow cookies for invibe.co in your browser. Then connect again from your AI app.
- Try this Go back to your AI app and connect again.
- Get help Contact your inVibe team.
- Get help Contact your inVibe team.
- The connection works, but expected projects are missing.
- Get help Contact your inVibe team to confirm your project access.
Make the plugin available to your team
This section is for the person who manages your AI app account. Get the inVibe Research plugin file from your inVibe team.
Claude
- Team or Enterprise: An Owner adds the plugin in Organization settings → Plugins & skills, then sets its Default access. The Owner also adds the invibe connector in Organization settings → Connectors. Each person then connects with their own inVibe login.
- Other plans: In Plugins, select Add → Upload plugin, choose the plugin file, and select Upload. Then follow the Claude steps in Connect in your AI app.
ChatGPT
- Business or Enterprise: A workspace Owner uploads the plugin and publishes it to the workspace. Members then find it under the workspace’s tab in Plugins. Each person connects with their own inVibe login.
- Other plans: In ChatGPT Desktop, select Plugins → Add → Upload plugin archive. Drag in the plugin file, or select click to upload. Then select Add plugin. The file already includes the inVibe connection, so don’t select Add custom MCP server.
Reconnect later
You normally connect once. If your AI app asks you to connect again, follow the same steps for your app.
For other questions, contact your inVibe team or email support@invibe.co.